Read our latest plugin review for the Progress bar!
Introducing the Progress bar
The Progress bar is a block plugin that allows students to manage their time spent within Moodle. The bar is colour coded to allow the users to easily see their progress. The progress can be tracked within individual courses as well as on the Dashboard page which combines progress for all courses.
Installing the Progress bar
The plugin is available to download in zip format from https://moodle.org/plugins/block_progress, just select your version of Moodle and then click download. The zip file should be unzipped and its contents should be moved into ‘Moodle’/blocks folder.
Once the files are moved into the correct directory you can login to the Moodle site as an admin and complete the installation by going to Site administration ► Notifications.
For me this process took only a few minutes and completed without any errors. As always, you should take a backup of your Moodle site before installing this plugin.

Configuration options
Once the plugin is installed you will get an initial configuration screen, this is also accessible at Site administration ► Plugins ► Blocks ► Progress Bar if you skipped this step initially.
On this screen you have a few configuration options, the first of which is deciding what course name to show on the Dashboard. You can choose to display courses by either their 'Short course name', or their 'Full course name', just simply select your choice from the dropdown menu.

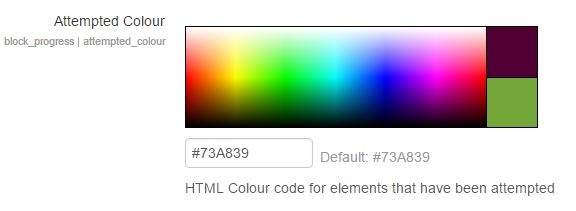
The next options are to choose which colours are used for ‘Attempted’, ‘Not – attempted’ and ‘Future Not-attempted colour’ when the block is displayed. These colours can be selected from the pallet provided by the plugin, or you can directly enter a HTML colour code into the box if you are after a specific colour.
The final configuration option on this page is ‘Show inactive students in overview’ by default this is set to ‘No’.

Block settings

To add a Progress bar to a course you will need to turn editing on within the course, then add a new block and select ‘Progress bar’ from the drop-down menu. The block will then display and will give you two options, 'Select activities/resources' or, 'Add all activities/resources'.
If you only want certain activities or resources to be used by the progress block then choose the ‘Select activities/resources’ option, or if you want to add all activities you can choose ‘Add all activities/resources’. After choosing either option you will be taken to a page with some additional configuration options for the block.
On this page you have the following settings:
- Add an 'alternate title' to the block. This is useful for using multiple instances of the progress bar block (such as 1 block for quizzes and another for assignments).
- 'Use icons in bar'. This may be useful for users who are colour-blind as it makes progress easier to identify without the user of colour.
- 'Order bar items by...'. This allows you to change the way that the order of items within the bar are ordered, by default it is set to order them based on the ‘Expected by’ date/time set within the activity/resource, alternatively you can change this setting to “ordering in course” which will order the items based on where they are displayed within the course.
- ‘Use NOW’. This feature will display an arrow which points to the item that has the ‘Expected by’ time closest to the current date to help students focus on the correct tasks. If your course is not focussed on deadlines you can set the “Expected by” dates in the far future and set ‘Use NOW’ to No. If the ‘order bar items by’ setting is set to ‘ordering in course’ then this setting is disabled.
- ‘Show percentage to students’. This will display a percentage on the progress block based on the amount of items complete divided by the total amount of items.
Activity / Resource settings
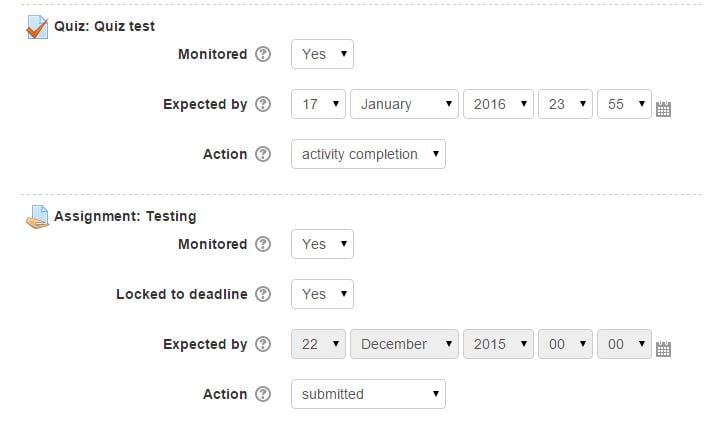
The settings that are available depend on the type of activity or resource that you are adding. The settings that are used for all types of activities/resources are as follows:
Monitored – This setting can be set to either 'Yes' or 'No', it will automatically be set to ‘No’ unless you chose the ‘Add all activities/resources’ button. When set to ‘Yes’ it will display the activity/resource within the block and will be displayed to students. Enabling this setting also allows the configuration of other settings for the activity/resource.
Expected by – This setting is a date/time that the block uses in order to display when an Activity or Resource is due to be complete. When an ‘Expected by’ date has passed the bar in the progress block for that activity or resource will be coloured in red. If the ‘Expected by’ date is in the future the block will display the activity/resource in blue.
For activity/resources that have a deadline already set within their settings, there is a ‘Lock to deadline’ option, this means that the ‘Expected by’ date is inherited from the activity/resource. If this setting is set to ‘No’, you will be able to set an ‘Expected by’ date as normal, this does not overwrite the deadline set in the activity/resource itself.
Action – This setting determines which action will mark the activity/resource within the block as Completed. The options within this setting vary depending on the type of activity/resource, for example an assignment may give the options of ‘Submitted’, ‘Marked’, or ‘Activity complete’.
The learner experience
As a learner the plugin adds an additional way of tracking their progress within a course. There is not much interaction with the plugin itself, however it does allow the user to mouse hover over each section within the block to see which activity/resource is selected and quickly navigate to the activity/resource by clicking the section of the bar.
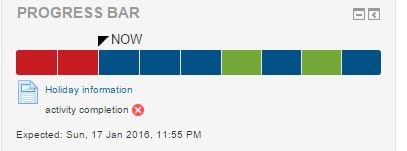
A user can add a Progress Bar block to their Dashboard, this will display the progress for all courses they are enrolled in with the progress bar configured. The block can also be moved into the content positon within the dashboard which gives a larger view of the block.
For teachers the block also allows you to view the progress overview for all students within a course. To do this, click the ‘Overview of students’ button within the Progress block.
Our verdict on the Progress bar
Pros:
- Easy to install
- Supported on multiple versions
- Aids in time management
- Allows quick access to activity/resources to students without being in the course
- There is not a large amount of configuration required in order to get the plugin working correctly
- For the user it is simple to understand and begin tracking progress through their courses
- Allows teachers to quickly view students’ progress.
Cons:
- If you add an activity or resource after configuring the block, you will need to reconfigure it in order for the new activity or resource to display
- The block has to be configured within each course manually.
(This plugin is great for any sites that can benefit from users being able to track their own progress)
Further documentation on this plugin
The following documentation is on the Progress Bar can be found at:
- Moodle Docs - https://docs.moodle.org/30/en/Progress_Bar_block
Worried your LMS isn't up to scratch?
Get an LMS Health Check from us here at Hubken Group.
We'll give you a detailed, independent review of your self-hosted Moodle or Totara Learn site, checking through the configuration and environment of your LMS, and picking up any common problems that your LMS might have.
So if you think your LMS might need a tune-up, just give us a shout and we'll show you what we can do.
About Hubken:
The Hubken Solution comprises powerful, flexible and tailored Learning Management System (LMS) services for organisations of all sizes. Leveraging the power of Moodleor Totara platforms we provide you with the tools to achieve outstanding eLearning outcomes, supporting you in areas including LMS hosting, installation, user training, content development, reporting and more.

Explore HubkenCore – our unique SaaS LMS offering
Ready to see how our new LMS bundled solution is revolutionising how you purchase an e-learning solution?

